
Took me a while to identify this cool puzzle by Terry, special thanks to Kevin for the following review by him:
Note: I was initially confused as to why this puzzle had pins inserted and Kevin cleared that up in the comment section of his blog - ‘The metal pins force the assembly to be the most complex of the 3 possible ones. It can be assembled in other ways with the same shape but the pins don’t line up.’

“My friend Terry Smart spends half of his time working off-shore on a North Sea oil rig. This means that he either has a LOT of time on his hands or very little. The usual work pattern for these guys is 2 weeks on rig and 2 weeks at home. A few years ago Terry spent a lot of time teaching himself to use Burrtools to design interlocking puzzles that were just a lot more interesting than the usual. The issue then was that he had to hope that one of our entrepid craftsmen would see his design and choose to make a few copies for the puzzling world. This was too much of a problem for our Terry and he decided in true Scottish fashion (yes, he shares the same impetuous genes that my wife has and which cause me a LOT of pain - Whack! Ouch! I rest my case!) to do something about it - he dived headlong into woodwork. I would love to do this but at the moment my livelihood depends on me having the correct number of fingers and after seeing the tablesaw injury 2 weeks ago, I think I will continue like that. Terry went to the internet and bought himself some of the best equipment for small scale woodworking that you can buy - he bought a whole bunch of stuff from Byrnes Model Machines and then had to pay an astronomical customs fee before he got his hands on it. I got a copy of his very first production series - Premiere and loved it.
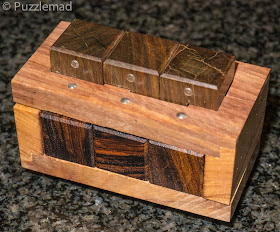
Terry recently announced a few new puzzles that he was planning on making and asked for people to sign up to buy them to give him an idea of how many to make. He also offered a few of us the chance to buy more expensive versions with fancy woods and, of course, you know I cannot resist the chance of gorgeous wood. It took him a while to get the batch done and half way through he realised that he needed a way to indicate correct orientation of some of the pieces for reassembly. In other words the puzzle has alternative assemblies which are less difficult or less interesting and there needed to be a method to mark the correct way for entrepid puzzlers attempting reassembly without computer assistance. A number of options were discussed and in the end we settled on stainless steel pins sunk into the relevant pieces - I think they look very nice. My version is made from Olivewood (frame), Lignum Vitae (long burr pieces) and Arizona Desert Ironwood (short burr pieces). It is gorgeous and surprisingly heavy for such a small puzzle (8 x 6 x 4cm) - the Ironwood and Lignum Vitae are very dense woods. The puzzle also has a nice musky aroma.
I received the puzzle about 2 weeks ago and after it was released from Mrs S' quarantine, I had a quick look. Terry was clearly not entirely happy with these special ones because prior to asking for payment he dropped the price and asked for our opinions. I was curious to see why he had been unhappy with them. The one thing that was immediately clear was that the puzzle was really quite loose but not so loose that pieces could be rotated or fall out without the correct sequence being used. When I took it into bright light for photos I could also see that there were some tool marks on the pieces but I did not feel that they detracted too much from the look. I hoped that the looseness would not make the puzzle too hard to solve - I doubted that Terry would send something out that was not going to function.
This puzzle is a really nice level of difficulty with a disassembly level of 16.11.8.5.3.3.5 - not impossibly tough but should be a fun exploration and sequence. It might also be possible to manage an assembly once taken apart. I enjoyed the exploration and it was only made a little harder by the looseness and required me to lift pieces a little to ensure that I could slide them. There are a couple of rotations which can happen and one will allow an early first piece removal but I ignored this. After about 30 minutes of progress, a piece fell out onto the sleeping cat on my lap and rolled off. I had no idea exactly how it had come out and I knew a Burrtools file would be needed for my first reassembly. The second piece came out in a rather unexpected fashion and then the third, despite being a very similar shape to number 2 came out a totally different way - this was lovely. The entire exploration is nicely visible and there are no blind moves to ruin things. After a few more minutes I had my lovely wood separated:

I made my BT file and back together. I love making BT files and this was a nice easy one. Having solved it the first time I wanted to see whether the reassembly might be possible without the computer. I spent a few hours over a couple of evenings, just exploring - going back and forth to understand how the pieces interacted and then disassembled it and scrambled the pieces and left them a few hours. Attempting the reassembly with a proper understanding of the puzzle was even more fun. I was able quite quickly to work out the intended end position of each piece and from that retrace a path back to the beginning. I seldom enjoy a puzzle reassembly but this one was really quite pleasant. I have done it quite a few times now and it is becoming a bit of a worry bead for me.
The other versions that Terry created using other less expensive woods did also look lovely and the fit was very good for them - this is one craftsman to keep an eye on for the future as his skills improve. It is pretty amazing that he is making pieces like this already and not using any glue at all! Stunning!
Thanks mate, I can't wait for the next puzzle!”
No comments:
Post a Comment